

You can have a working WordPress blog online in about an hour, for less than the cost of a meal out each month. This guide walks you through every step, from picking a topic to publishing your first post and getting it in front of readers.
We build WordPress plugins for a living and have set up more blogs than we can count. This is the process I would follow if I were starting from zero today.
Disclosure: some links in this guide are affiliate links. If you buy through them, we may earn a commission at no extra cost to you. We only recommend services I would use myself.
Why WordPress?
WordPress runs a large share of all websites on the internet, from personal journals to major news sites. For a blog, it has three big advantages:
- You own everything. Your content, your design, and your audience stay yours. No platform can shut you down or change the rules overnight.
- It grows with you. Start with a simple blog. Later, add a shop, a newsletter, courses, or a membership area with plugins.
- It is free. The software costs nothing. You only pay for a domain name and hosting.
One point that confuses many beginners: WordPress.org and WordPress.com are different. WordPress.org is the free software you install on your own hosting. WordPress.com is a hosted service run by a company, with limits on lower plans. This guide uses the self-hosted WordPress.org version, because it gives you full control.
What you need to get started
- A domain name, which is your blog’s address, like
yourblog.com - A hosting account, which is where your blog’s files live
- About an hour of focused time
- No coding skills
How much does a WordPress blog cost?
| Item | Typical cost | Required? |
|---|---|---|
| Domain name | About $10 to $20 per year | Yes (often free for year one with hosting) |
| Shared hosting | About $2 to $12 per month on a first-term deal | Yes |
| WordPress software | Free | Yes |
| Theme | Free, or $50 to $100 for a premium one | No |
| Plugins | Free for the essentials | No |
| Email newsletter tool | Free up to a few hundred subscribers | No |
A realistic first-year budget is under $100. Watch the renewal price, though. Most hosts offer a low introductory rate that goes up when your first term ends. Choosing a longer first term locks in the low price for longer.
Step 1: Pick what your blog is about
Some folks call it niche. I think we should just call it niche.
The blogs that last are the ones whose owners do not run out of things to say. Before you buy anything, test your idea with three questions:
- Could you write 30 posts on it? List the titles. If you get stuck at 10, the topic is too narrow, or not interesting enough to you.
- Is someone searching for it? Type a few of your post ideas into Google and look at the “People also ask” box and the suggestions at the bottom of the page. Real questions mean real readers.
- Can it make money later? You do not need to monetize on day one. But a topic with products, tools, or services around it gives you options.
The sweet spot is a topic you know well, that people actively search for, and that is specific enough to stand out. “Food” is crowded. “Budget Canadian meals for students” has a clear reader.
Step 2: Choose a name and a domain
Your domain is your blog’s permanent address, so give it ten minutes of thought.
- Keep it short and easy to spell when you say it out loud.
- Prefer .com if it is available. A country domain such as .co.ke, or .co.uk works well if your readers are mostly local.
- Avoid hyphens and numbers. They are easy to mistype and hard to say.
- Do not box yourself in.
BestRunningShoes2026.comwill age badly. A brandable name gives you room to grow.
Most hosts include a free domain for the first year, so you can search for and register your name in the next step.
Step 3: Choose your hosting
Your host stores your blog’s files and serves them to your readers. For a new blog, you do not need anything expensive. You need a host that is reliable, reasonably fast, installs WordPress for you, and has support that answers.
Here are the three I suggest, depending on where you are:
| Host | Best for | Why | Watch out for |
|---|---|---|---|
| Hostinger | Most beginners | Low entry price, a simple control panel, free domain on longer plans, WordPress installed in a few clicks | Renewal price is higher than the first term |
| Bluehost | Beginners who want a well-known US brand | Long WordPress track record, guided onboarding, free domain for the first year | Upsells during checkout; untick add-ons you do not need |
| Kinsta | Blogs that already get steady traffic | Managed WordPress hosting with daily backups, staging, and strong performance | Costs several times more; overkill for a brand new blog |
If your blog later outgrows shared hosting, you can upgrade to a managed WordPress plan or a cloud VPS without changing hosts.
Whatever host you pick, make sure the plan includes a free SSL certificate (the padlock in the browser bar), automatic WordPress installation, and backups.
Step 4: Sign up and install WordPress
The signup flow looks slightly different on every host, but the steps are the same.
- Pick a plan. The cheapest plan that allows one website is fine for a new blog. Choose a 12, 24, or 48 month term to lock in the introductory price.
- Claim your domain. Type in the name you chose in Step 2. If it is taken, try a small variation.
- Create your account and pay. Before paying, review the cart and untick any extras you did not ask for.
- Run the setup wizard. Most hosts will ask whether you want to create a WordPress site. Say yes, then pick a username, a strong password, and an email address you check often.
- Wait a few minutes. The host installs WordPress, connects your domain, and adds SSL. A new domain can take a little while to work everywhere.
- Log in. Go to
yourblog.com/wp-adminand sign in with the details from the wizard.
Step 5: Get your bearings in the dashboard
The WordPress admin dashboard looks busy at first, but you will spend most of your time in four places:
- Posts: your blog articles, shown newest first.
- Pages: standalone pages such as About and Contact.
- Appearance: your theme and site design.
- Plugins: add-ons that give your blog new features.
Before going further, clean up the demo content. Delete the “Hello world!” post, the “Sample Page,” and any plugins your host installed that you do not plan to use.
Step 6: Choose a theme and make it yours
Your theme controls how your blog looks. Modern WordPress uses block themes, which let you edit every part of the design (header, footer, colors, and fonts) in the Site Editor without code.
Go to Appearance » Themes » Add New Theme. Use the filters to show block themes, preview a few, and install the one you like.
A few tips:
- Pick for readability, not effects. A clean layout with a readable font beats sliders and animations.
- Check it on your phone. Most of your readers will visit on mobile.
- Start with a free theme. You can always switch later. WordPress’s own default theme is a solid, minimal option for blogs.
Once installed, open Appearance » Editor. Under Styles, set your colors and fonts. Then edit the header to add your logo and menu.
Step 7: Set up the essentials
Ten minutes here will save you hours later.
Settings to change right away
- Settings » General. Set your site title, tagline, and timezone.
- Settings » Permalinks. Choose Post name so your URLs look like
yourblog.com/my-first-post/. Do this before you publish, because changing it later can break links. - Settings » Reading. Decide whether your home page shows your latest posts or a static page. Make sure “Discourage search engines” is unchecked.
- Settings » Discussion. Turn on comment moderation so nothing goes live until you approve it.
- Users » Profile. Add your display name and a short bio. It appears on your posts.
Plugins worth installing
Plugins add features, but each one is extra code to maintain. Start with only what you need:
| Job | Free options | Why you need it |
|---|---|---|
| Backups | UpdraftPlus, or your host’s built-in backups | Restore your site if something breaks |
| Security and two-factor login | Wordfence, Two Factor | Block brute-force logins |
| SEO | Yoast SEO, Rank Math, All in One SEO | Titles, descriptions, and sitemaps for search engines |
| Spam protection | Akismet Anti-spam | Stops comment spam |
| Analytics | Site Kit by Google | Traffic stats inside your dashboard |
| Contact form | WPForms Lite, Contact Form 7 | A way for readers to reach you |
| Caching | Your host’s cache, or a caching plugin | Faster page loads |
Pick one plugin per job. Two SEO plugins or two caching plugins will conflict.
If you write long, research-heavy posts, a footnotes plugin is handy for citing sources without cluttering your text.
To install any of these, go to Plugins » Add New Plugin, search by name, then click Install Now and Activate.

Pages every blog needs
Create these under Pages » Add New Page:
- About: who you are, what the blog covers, and why readers should trust you.
- Contact: a simple form or an email address.
- Privacy Policy: WordPress includes a starter template under Settings » Privacy. Edit it to match the tools you actually use.
Add these pages to your menu or footer in the Site Editor.
Step 8: Write and publish your first post
Go to Posts » Add New Post to open the block editor. Each paragraph, heading, image, or list is a “block.” Click the + button to add one, or type / followed by the block name.
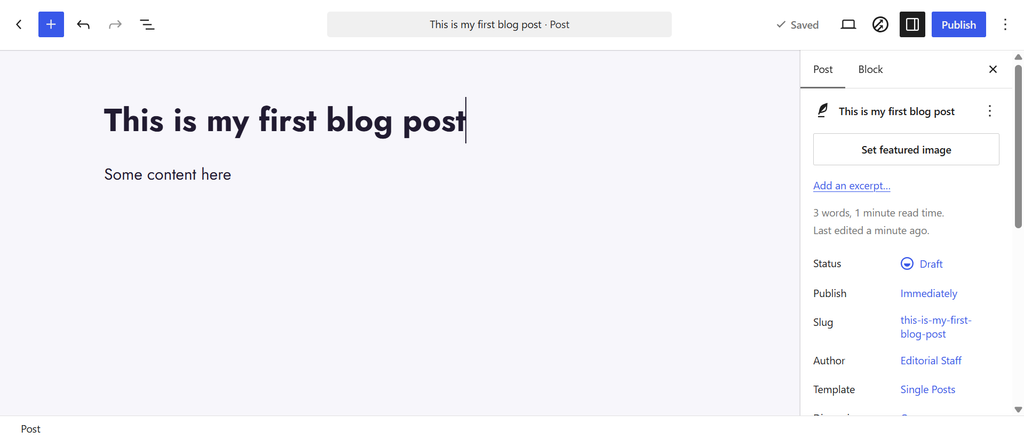
A simple structure that works for most posts:
- A clear title that says exactly what the reader gets.
- A short intro that confirms they are in the right place.
- Headings (H2 and H3) to break the post into sections people can scan.
- Images with descriptive alt text, for accessibility and search.
- A closing line that tells readers what to do next.
Before you click Publish, open the settings sidebar and:
- Add a category and a few tags.
- Set a featured image.
- Write a short excerpt, and fill in your SEO plugin’s title and description.
- Click Preview to check how it looks on desktop and mobile.
Do not aim for perfection on your first post. Aim for done. You will get better with every post you publish.
Step 9: Get your first readers
Publishing is half the job. Here is how to get people to actually read your posts:
- Submit your site to Google. Add it to Google Search Console and submit the sitemap your SEO plugin created. This helps Google find new posts faster.
- Write for real questions. Base posts on things people search for, and answer the question early in the post.
- Link your posts together. When you mention a topic you have covered, link to that post. It helps readers and search engines.
- Share where your readers already are. That might be X, LinkedIn, Facebook groups, WhatsApp communities, or forums. Join the conversation before you share links.
- Start an email list from day one. Social reach goes up and down. Your email list is an audience you own. Tools like Mailchimp or MailPoet are free to start.
Step 10: Keep your blog healthy
A blog needs a little regular care:
- Update WordPress, themes, and plugins at least once a week. Most security problems come from outdated software.
- Check your backups once a month by confirming a recent backup exists and you know how to restore it.
- Publish on a schedule you can keep. One good post a week beats five rushed posts followed by silence.
- Refresh old posts every few months. Update facts, screenshots, and links so they stay useful.
Step 11: Make money from your blog
Once you have steady traffic, these are the most common ways to earn:
| Method | How it works | When it makes sense |
|---|---|---|
| Affiliate marketing | Recommend products and earn a commission on sales | Early on, if your posts help people choose what to buy |
| Display ads | Ad networks place ads on your pages | Once you get consistent monthly traffic |
| Digital products | Sell ebooks, templates, or courses | When readers keep asking you the same questions |
| Services | Offer consulting, freelance work, or coaching | Right away, if your blog shows your expertise |
| Sponsored posts | Brands pay for a review or mention | Once you have a clear, engaged audience |
Whichever you choose, be open about it. A clear disclosure keeps your readers’ trust, and trust is what makes a blog worth reading.
Common mistakes to avoid
- Choosing a topic only for the money. You will run out of steam before the money arrives.
- Spending weeks on design. Readers come for the content. A clean theme is enough to launch.
- Installing too many plugins. Every plugin adds weight and something else to update.
- Skipping backups. It only takes one bad update to lose months of work.
- Ignoring mobile readers. Always preview posts on a phone before publishing.
- Quitting too early. Most blogs take six months or more to see steady search traffic.
Frequently asked questions
Can I start a WordPress blog for free? You can test WordPress for free with WordPress Playground, but a public blog on your own domain needs hosting. Free hosting usually comes with ads, slow speeds, or limits that hurt a serious blog.
Do I need to know how to code? No. Everything in this guide uses the WordPress dashboard and block editor. Code only becomes useful when you want deeper customizations.
How long does it take to set up? About an hour for the technical setup. Writing your first few posts will take longer, and that is where your effort should go.
Can I move my blog to another host or plan later? Yes. Migration plugins and most hosts’ free migration services make it straightforward. This is why it is fine to start on a cheaper plan.
How often should I post? As often as you can keep up with good quality. For most new bloggers, that is one post a week.
Final thoughts
Starting a WordPress blog is the easy part. The real work is showing up week after week with posts that help your readers. Pick a topic you care about, get set up in an afternoon, and publish your first post this week.
If you get stuck at any step, leave a comment below and I will help you sort it out.



Leave a Reply